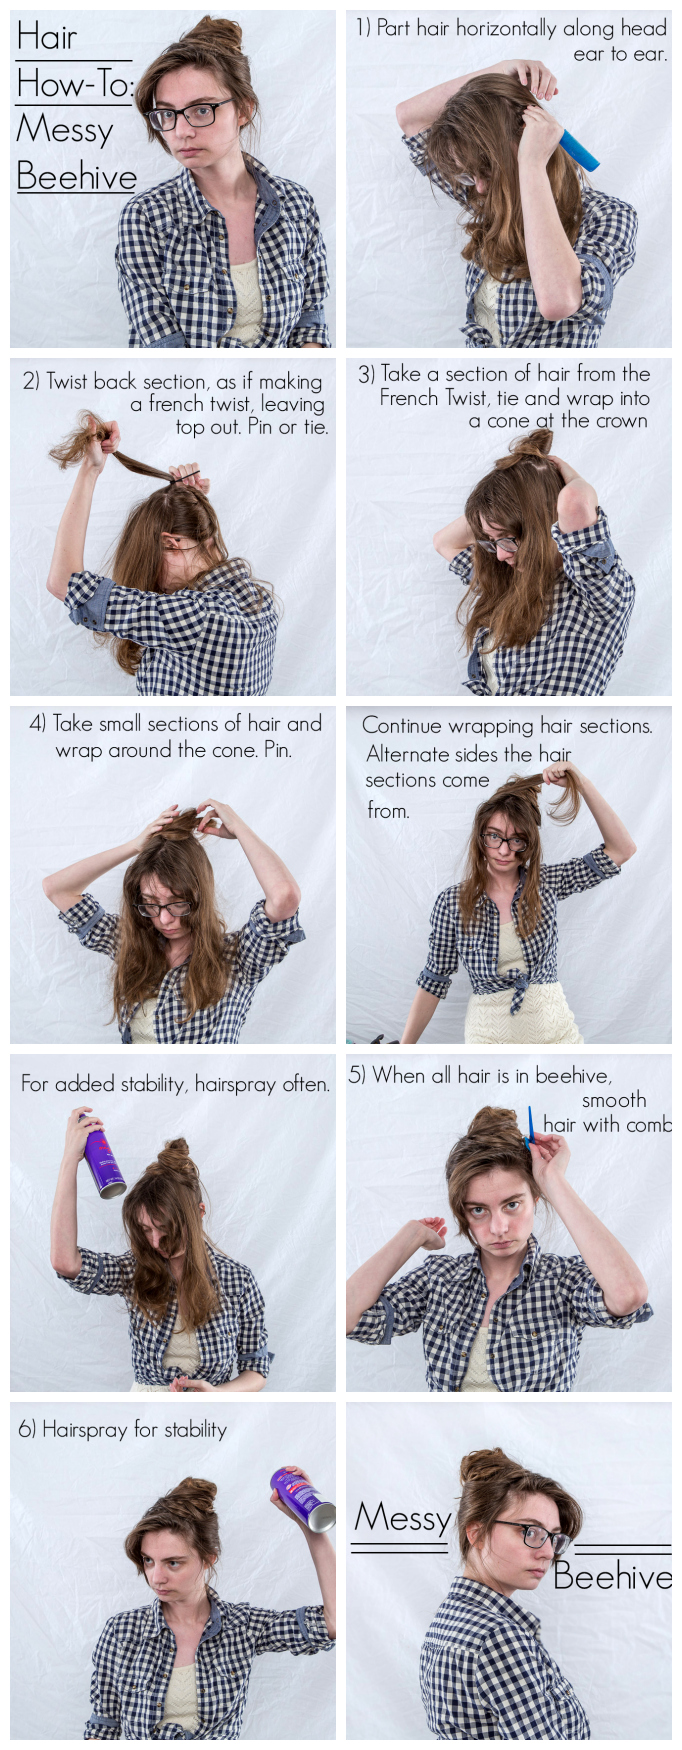
1) Part Hair Horizontally along head ear to ear.
In this step you are dividing your hair in half by parting it, seperating the hair in front from the hair in the back. Use the tops of your ears as guides for the ends of the parts.
2) Twist back section, as if making a French twist, leaving the top part out. Pin or tie.
Take the hair in the back section and twist it, as if making a French Twist. Rather than the tucking the extra hair coming from the top of the twist into the twist, you will simple tie or pin the hair as is.
3) Take a section of hair from the French twist, tie and wrap into a cone at the crown.
You can use about a two-by-two inch section of hair for this step, no more. that means, you do not need all the hair from the twist, per say but you could. Or you could use just some of it, depending on how thick your hair is. You will tie this section of hair at the crown of your head. Then proceed to wrap the hair around itself; it will form a cone-ish shape. Do not worry if it looks more cylindrical than conical, but it will not affect the over shape too much.
You can backcomb the section of hair that will be used to make the comb in order to get more volume and stability.
4) Take small sections of hair and wrap around the cone. Pin.
This is the step you will be repeating over and over to make the hair-do. Take a section of hair and wrap it around the cone, hair-spraying and pinning as needed. Ideally each of these sections of hair will be about 2 inch by 2inch squares.You usually will alternate wrapping hair sections clockwise or counter-clockwise around the cone, but you may end up doing several section in a row in the same direction, depending where there are gaps or uneven distribution of hair.
For more volume and stability, you might consider backcombing section of hair. For smoother results, use the comb to guide the hair around your head. For added stability, you can use hairspray more.
5) When all hair is in beehive, smooth with comb
Obviously the cone of hair is the beehive. Beehives usually look smooth, even "messy" ones. Smooth out bumps with combing and pins.
6) Hair spray for stability
Give everything one last spray.


Ooh, thanks! I've been meaning to learn how to do this. I will bookmark this for when I'm channeling my inner Joan from Mad Men :)
Reply Delete-Annie
Glad to be of help. Can't wait to see your Mad-Men inspired looks, then.
DeleteCute! I've always wanted to try out a beehive.
Reply DeleteHope to see you sporting one on your blog sometime then!
DeleteThis is so fun, I really need to try it sometime! Thanks for the tutorial :)
Reply Delete~Alyssa
www.butterfliesonmars.blogspot.com
Tjanks Alyssa. Tweet me a pic of you if you try it
Delete:D
Such a cute up-do..thanks for sharing! xo
Reply DeleteGreat tutorial with lots of pictures! I am rubbish when it comes to updos, I can just about manage the top knot. Will definitely try this out t'moro morning!
Reply DeleteHalima
xx
Hope you were able to make this! Tweet me a picture if you do try it out :)
Deleteoh man, I wish that my hair would do that!
Reply Delete